
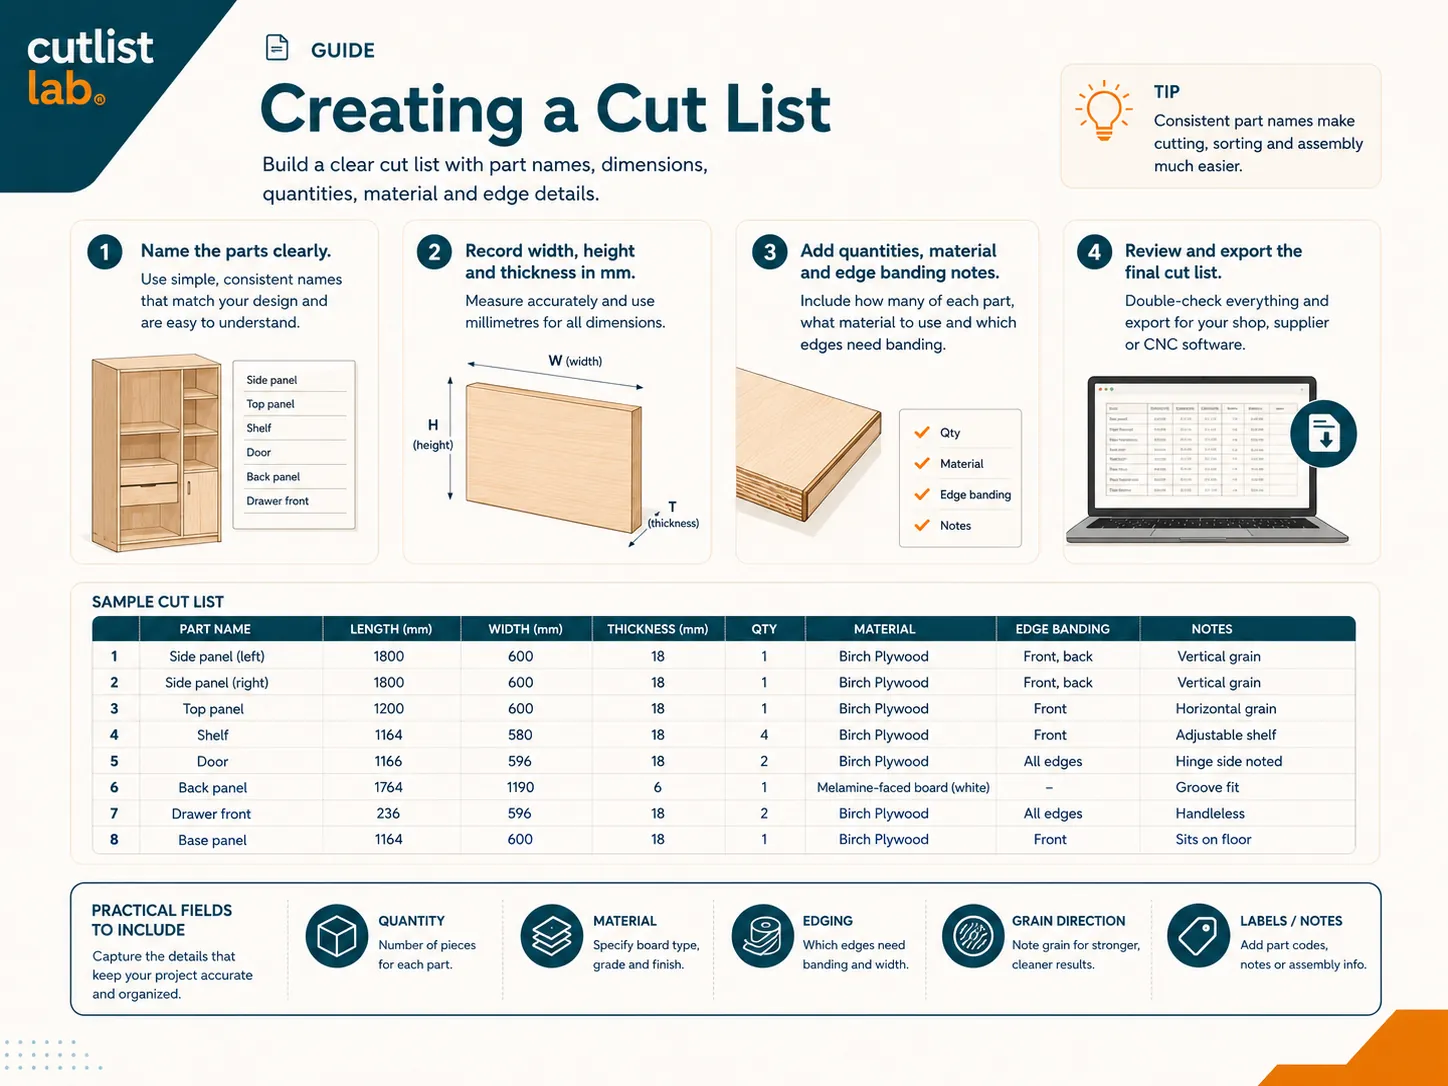
What is a cut list?
A cut list is simply the list of every part you need to cut from sheet material, each with its size, quantity and material. It is the input the optimizer uses to nest your parts onto as few sheets as possible, with the least waste. Think of it as the parts list for your project, written in millimeters or inches instead of words.
What goes in a cut list?
For each part you want at least:
- Name: so you can tell parts apart at the saw (Side, Shelf, Door…).
- Length and width: the finished size of the part.
- Quantity: how many identical pieces.
- Material and thickness: so parts only nest onto matching sheets.
Useful extras: the grain direction (for plywood or wood-decor sheets), and edge banding per side if you band visible edges. cutlistlab uses these to keep visible grain aligned and to correct the cut size where you band an edge.
| Name | Length | Width | Qty | Material | Thickness |
|---|---|---|---|---|---|
| Side | 720 | 400 | 2 | Plywood (birch) | 18 |
| Top / bottom | 564 | 400 | 2 | Plywood (birch) | 18 |
| Shelf | 560 | 380 | 3 | Plywood (birch) | 18 |
| Back | 588 | 708 | 1 | Hardboard | 4 |
From sizes to a cutting plan in five steps
- List your parts. Write down each panel with its finished length, width and quantity. Sketch the project first if that helps.
- Set the material and thickness. Parts only nest onto a sheet of the same material and thickness, so be specific.
- Add grain and edge banding where they matter. Lock the grain on visible faces; mark which edges get banding.
- Pick your sheet size. A standard sheet, or your own size. The optimizer can also tell you how many sheets you need.
- Calculate. You get a layout with the least waste, a numbered cutting order, and printable labels for each piece.
Sharing or reusing your cut list (CSV)
You can paste a table straight from a spreadsheet, or import a CSV with columns like name, length, width, quantity and material. That makes it easy to reuse a list, tweak a few sizes, and recalculate. You can also export the cut list as a CSV to keep with the project.
Common mistakes
- Mixing finished size and cut size. Enter the finished size; let the tool handle the kerf and banding.
- Forgetting the back panel or drawer bottoms. Thin parts are easy to miss and change the sheet count.
- Ignoring grain on visible parts. A rotated panel can show its grain the wrong way.
- Rounding sizes too early. Keep real dimensions; the optimizer is more accurate than mental math.
Build your cut list in the tool. In cutlistlab you type your parts (or design a cabinet and let the panel sizes fill in), pick your sheet, and get a cutting plan with the least waste, free, no account, on your phone at the bench.
What a cut list looks like
A good cut list is just a table: per part a name, the length and width, the quantity, the material and whether the grain is fixed. For a simple wall cabinet it looks like this:
| Name | Length (mm) | Width (mm) | Qty | Material | Grain |
|---|---|---|---|---|---|
| Side panel | 600 | 300 | 2 | Plywood 18 | Vertical |
| Top and bottom | 564 | 300 | 2 | Plywood 18 | Horizontal |
| Fixed shelf | 564 | 280 | 1 | Plywood 18 | Free |
| Back panel | 588 | 588 | 1 | Hardboard 3 | Free |
You can paste exactly these columns from Excel or Numbers, or import them as CSV. Download the CSV template to start quickly. The tool then turns it straight into a cutting plan: how many sheets, the layout and a numbered cutting order. A "free" grain means the part may rotate to pack tighter; lock the grain and the piece stays correctly oriented.
Frequently asked questions
What is a cut list?
The list of all parts you cut from sheet material, each with length, width, quantity, material and thickness. It is the input for a cutting plan.
Finished size vs cut size?
Finished size is the part when it is done; cut size is what you actually cut, which can differ because of the saw kerf or edge banding. cutlistlab works on the cut size and shows both.
Do I need the grain direction?
Only when it matters. Lock the grain on visible plywood or wood-decor parts; grain-free sheets like MDF or melamine can rotate freely for less waste.